

10 th week python experience

its me Anish , a student on a journey unravels the mysteries of his black box AI and rewrite the boundaries of intelligence, one line of code at a time, reminding us that even the most complex machines can spark the most human of adventures.
Introuction
As the world of machine learning continues to evolve, the need for structured and scalable code becomes ever more paramount. Enter Object-Oriented Programming (OOP) – a programming paradigm that revolves around the concept of objects and classes. Python, with its clear syntax and OOP support, stands as an ideal language for integrating machine learning with OOP principles
Objects and Classes
Objects are at the core of object oriented programming. With minimum jargon, let us try to understand what it all means. The simplest way of understanding the idea of objects is with the help of this wonderful phrase:
Unity in diversity
What unites all of us? We are all humans. We call this planet home.
And yet, each of us is different. Each individual is unique. For example, height and weight are two obvious properties that make each individual stand out. In more philosophical terms, there are two forces in operation here: a global force that unites all of us and a local force that gives each one of us our own special identity. In the terminology of object oriented programming, each human being is an object. But all these objects belong to the class called "Humanity".
This idea can be extended further. As a more mundane example, think about cars on the road. No two cars are the same. The brand of a car is one obvious point of difference. Even two cars of the same brand could be moving at different speeds. The speed of a car is another point of difference. However, a car is not the same as a train. We know a car when we see one. There are certain global features that are common to all cars and there is no mistaking that. In the terminology of object oriented programming, each car is an object. But all these objects belong to the class called "Car".
We are now ready to move from the concrete to the abstract.
Objects are entities that have certain attributes(variables) along with behavior(function) associated with them.
For example, cars on the road could have the following attributes: speed, fuel level. The operations associated with it could be: start, stop, accelerate, decelerate, fill fuel tank. Given this basic understanding of what we mean by objects, we are now ready to define a class:
A class is a blueprint or a template that is used to create objects.
The specification of what constitutes a car is present in a class, say Car, note that capital "C". The specification of what makes a human is present in another class, say Human. Think about a class as a Google form. A form is nothing but a template. The template is created once and then it is distributed. Each of us fills this form differently hence creating different objects.
Object Oriented Programming (OOP) is a paradigm that looks at the world as a collection of objects and the interactions among them.
Rather than focusing on more definitions, let us jump in and look at OOP in action.
class Student:
    roll_no = None
    Name = None

# Creating an instance/object of the Student class
s0 = Student()

# Assigning values to attributes of the object s0
s0.roll_no = 0
s0.Name = 'Bhuvanesh'

# Accessing and printing the attributes of the object s0
print(s0.roll_no, s0.Name)

# Creating another instance/object of the Student class
s1 = Student()

# Accessing and printing the attribute roll_no of the object s1
print(s1.roll_no)
Explanation:
Class Definition: The code begins with the definition of a class named
Student. This class acts as a blueprint for creating student objects. It has two attributes:roll_noandName, both of which are initially set toNone.Object Creation: Two instances of the
Studentclass are created:s0ands1. These instances represent individual students and are independent of each other.Attribute Assignment: For the object
s0, values are assigned to its attributesroll_noandName. Similarly, no values are assigned to the attributes of thes1object.Attribute Access: The values of the attributes for the object
s0are accessed and printed using dot notation (s0.roll_no,s0.Name). This demonstrates how object attributes can be accessed and manipulated.Attribute Access without Assignment: The attribute
roll_noof the objects1is accessed and printed. Since no value was assigned tos1.roll_no, it printsNone, which was the initial value set in the class definition.
OOP in Python: an example
Consider a very simple template for a student that has following information:
Name
Marks
We want to perform the following operations:
Update the marks of the student
Print student details
class Student:
    def __init__(self, name, marks):
        self.name = name
        self.marks = marks5
    def update_marks(self, marks):
        self.marks = marks8
    def print_details(self):
        print(f'{self.name}')
class is a keyword in Python to define classes. It is similar to the def keyword that is used to define functions. Student is the name of the class that we are creating. Within the class, we see that there are three functions: __init__, update_marks and print_details. Functions defined inside a class are given a special name, they are called methods of the class. Among the methods that can be defined for a class, __init__holds a special place and is called the constructor. Let us first see how to create an object of type Student:
anish = Student('Anish', 95)
anish is now an object of type Student. To verify this, run the following command:
print(type(anish)) # output should be: <class '__main__.Student'>
We shall take up this example in the next para and understand various features of a class.
For now, don't bother too much about the keyword self. We will get to that soon.
class Student:
    def __init__(self, name, marks):
        self.name = name
        self.marks = marks5
    def update_marks(self, marks):
        self. Marks = marks8
    def print_details(self):
        print(f'{self.name}:{self.marks}')
As we saw , an object of the class Student can be created like this:
anish = Student('Anish', 80)
Notice that we have used the name of the class in the RHS of the assignment statement. This invokes what is called the constructor__init__ method of the class. Since the constructor has two parameters (ignore self for now) name and marks, we have to pass them as arguments while creating the object.
The two arguments are then assigned to self.name and self.marks respectively. These two variables are called the object attributes . Attributes can be accessed using the . operator:
print(anish.name)
print(anish.marks)
__init__, update_marks and print_details are called methods. A method is effectively just another function. Methods can be accessed using an object. If we wish to update Anish's marks to 95, then we invoke the method using the object anish:
anish.update_marks(95)
When anish.update_marks(95) is called, the attribute marks that is tied to the object anish is updated to 95.
To summarize, anish is an object of type Student having two attributes — name and marks — that can be accessed using the . operator. This object is also equipped with two methods (ignoring the constructor), one to update the marks and the other to print the details of the object. Attributes define the state of an object. Different objects of the same class could have different attributes. Naively speaking, methods help to update the values of the attributes. Therefore, the methods capture the behaviour of the object.
self
Some of you might be wondering about the variable self that crops in so many places in the definition of the class. The variable self is used to point to the current object. To get a better understanding, let us create two different students (objects):
anish = Student('Anish', 90)
lakshmi = Student('Lakshmi', 95)
How do we print the details of the student Lakshmi?
lakshmi.print_details()
When this method is called, Python actually ends up invoking the following function:
Student.print_details(lakshmi)
That is, it passes the current object as an argument. So, the variable self points to the current object. Another example:
anish.update_marks(95)
This is equivalent to the function call:
Student.update_marks(anish, 95)
This is a mechanism that Python uses to know the object that it is dealing with. And for this reason, the first parameter in every method defined in a class will be self, and it will point to the current object.
This should also clear up any confusion that lines 3 and 4 could have caused:
class Student:
    def __init__(self, name, marks):
        self.name = name
        self.marks = marks
self.name= name is the following operation: assign the value of the argument name to the current object's attribute self.name. A similar operation follows for self.marks.
Class Attributes vs Object Attributes
So far all attributes that we have seen are object attributes. Given an attribute, say name or marks, it is different for different objects. The name attribute of anish is different from the corresponding attribute of the object lakshmi. Now, we shall see another kind of attribute.
Let us say that we wish to keep track of the number students in our program. That is, when a new student joins our program, we need to update a counter. How do we do that? We need an attribute that is common to all objects and is not tied to any individual object. At the same time, we should be able to update this attribute whenever a new object is created. This is where the concept of class attributes comes in:
class Student:
    counter = 0
    def __init__(self, name, marks):
        self.name = name
        self.marks = marks
        Student.counter += 1

    def update_marks(self, marks):
        self.marks = marks

    def print_details(self):
        print(f'{self.name}:{self.marks}')
Now, let us say that three students join the program:
madhavan = Student('Madhavan', 90)
print('Number of students in the program =', Student.counter)
andrew = Student('Andrew', 85)
print('Number of students in the program =', Student.counter)
usha = Student('Usha', 95)
print('Number of students in the program =', Student.counter)
This gives the following output:
Number of students in the program = 1
Number of students in the program = 2
Number of students in the program = 3
Notice that we have used Student.counter to access the attribute counter. Such attributes are called "class attributes". All objects of the class share this attribute. At this stage, we can try the following exercise:
print(madhavan.counter)
A class attribute can be accessed by any of the objects. But, now, try to run this code:
madhavan.counter = -1
print(Student.counter)
print(madhavan.counter)
This seems confusing! But a moment's thought will convince you that it is not so hard. In line-1, we are creating an object attribute with the same name as the class attribute! If the same attribute name occurs in both an object and a class, then Python prioritizes the object attribute. This demonstrates an important fact: class attributes cannot be updated by an object! At best, they can be referenced or accessed using an object.
This also introduces another important point: object attributes can be created dynamically during runtime. So far, we have seen object attributes being created within the constructor. This is not binding. For example, consider the following snippet:
class Student:
    def __init__(self, name):
        self.name = name
anish = Student('Anish')
anish.maths = 100
anish.physics = 90
anish.chem = 70
We have created three more object attributes on the fly. It is interesting to note the subtle difference between the attributenameand the three new attributesmaths,physicsandchem. Any object ofStudentwill have the attributenamewhen it is initially created, of course with a different value fornamedepending on the object. But the attributesmaths,physicsandchemare unique to the objectanish.
another point:
class Student:
  count=0
  def __init__(self,roll_no,name,tot) :
    self.roll_no = roll_no
    self.name = name
    self.total=tot
    Student.count+=1

  def display(self):
    print(self.roll_no,self.name)


  def result(self):
    if self.total>120:
      print("Pass")
    else:
      print("Fail")


s0=Student(0,'Bhuvanesh',100)
s1=Student(1,'Harish',200)
s1.skin='black'


print(s1.skin)
s0.display()
print(Student.count)
s0.result()
# output
black
0 Bhuvanesh
2
Fail
Everything is an object, every object has attributes and behavior Eg: A person (object); name, age (attributes); singing, driving (behaviour)
attributes -> variables; behaviors ->functions
0 , Bhuvanesh : object variables
2 : class variable
Fail or Pass : Behavior of the object
important note : Int(),str(),dict(),list() These all are classes and they can be called like functions (constructor) So we are basically creating objects of that class
Inheritance
Inheritance is a mechanism in object-oriented programming that enables a class (subclass) to acquire the properties and behaviors of another class (superclass). The subclass inherits attributes and methods from its superclass, allowing it to reuse existing code and extend the functionality provided by the superclass.
Let us get back to the fundamental philosophical idea with which we began the study of object oriented programming.
Unity in diversity.
The idea of a class represents the unity, the idea of objects represent the diversity. But this diversity that we see around us is not chaotic and unordered. On the contrary, there is an organized hierarchy that we see almost everywhere around us. Consider the following image:
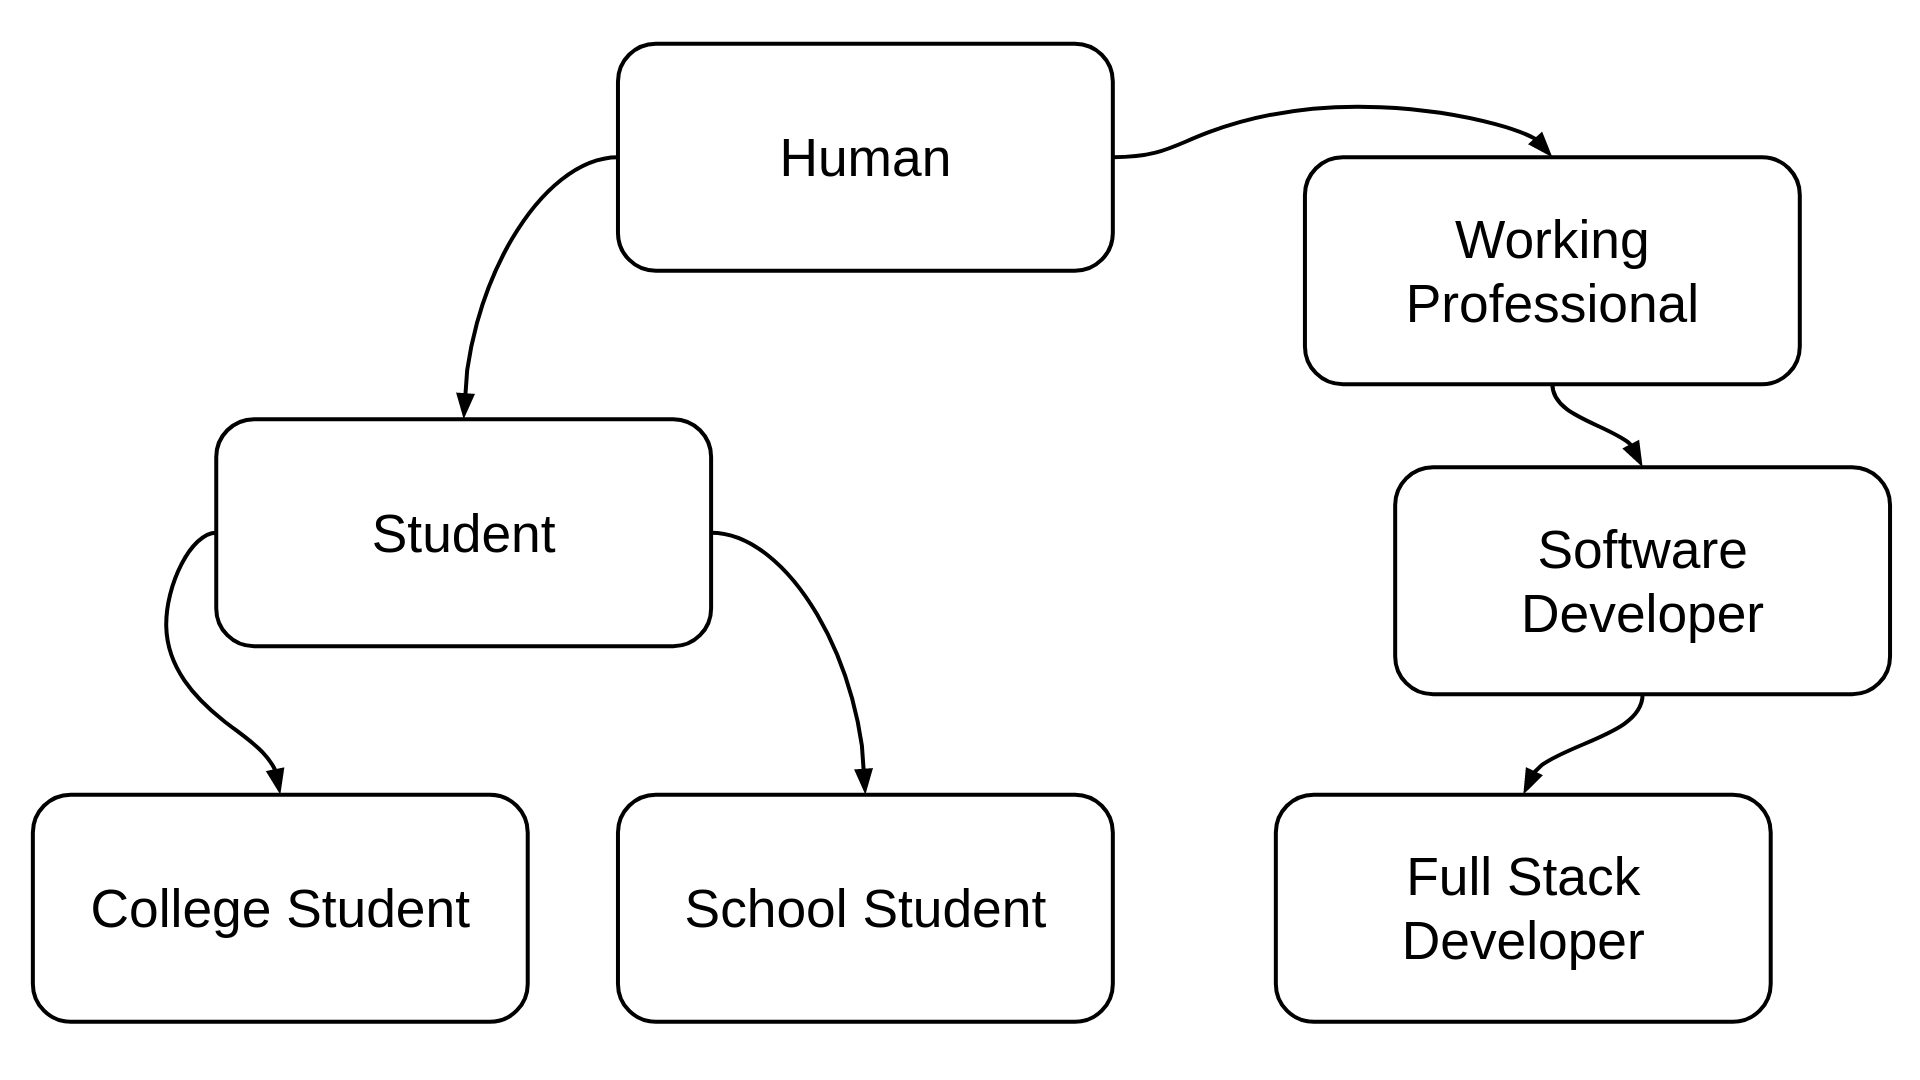
We humans take up different roles. Some of us are students, others are working professionals. we see that there is a hierarchy. All college students are students. All students are humans. In the other branch of this directed graph, all full-stack developers are software developers, all software developers are working professionals. The basic idea behind the concept of inheritance is this:
Classes that are lower in the hierarchy inherit features or attributes from their ancestors.
There are certain features of a class higher up in the hierarchy that can be inherited by classes lower in the hierarchy. For example, all working professionals draw a salary every month. All software developers also draw some monthly salary, because they belong to the class of working professionals. So, salary is an attribute that is common to all classes that are derived from the class of working professionals. Needless to say, a full stack developer inherits this attribute of salary from his ancestors in the graph.
We shall take up a concrete example and see inheritance in action.
Concrete Example
By now you would have worked on plenty of assignments across multiple courses. Each assignment is a collection of questions. Questions come in different types, some are NAT, some MCQ. So, a NAT question is not of the same type as a MCQ question. Yet, both are questions. So, we see that there is a hierarchy of relationships here:
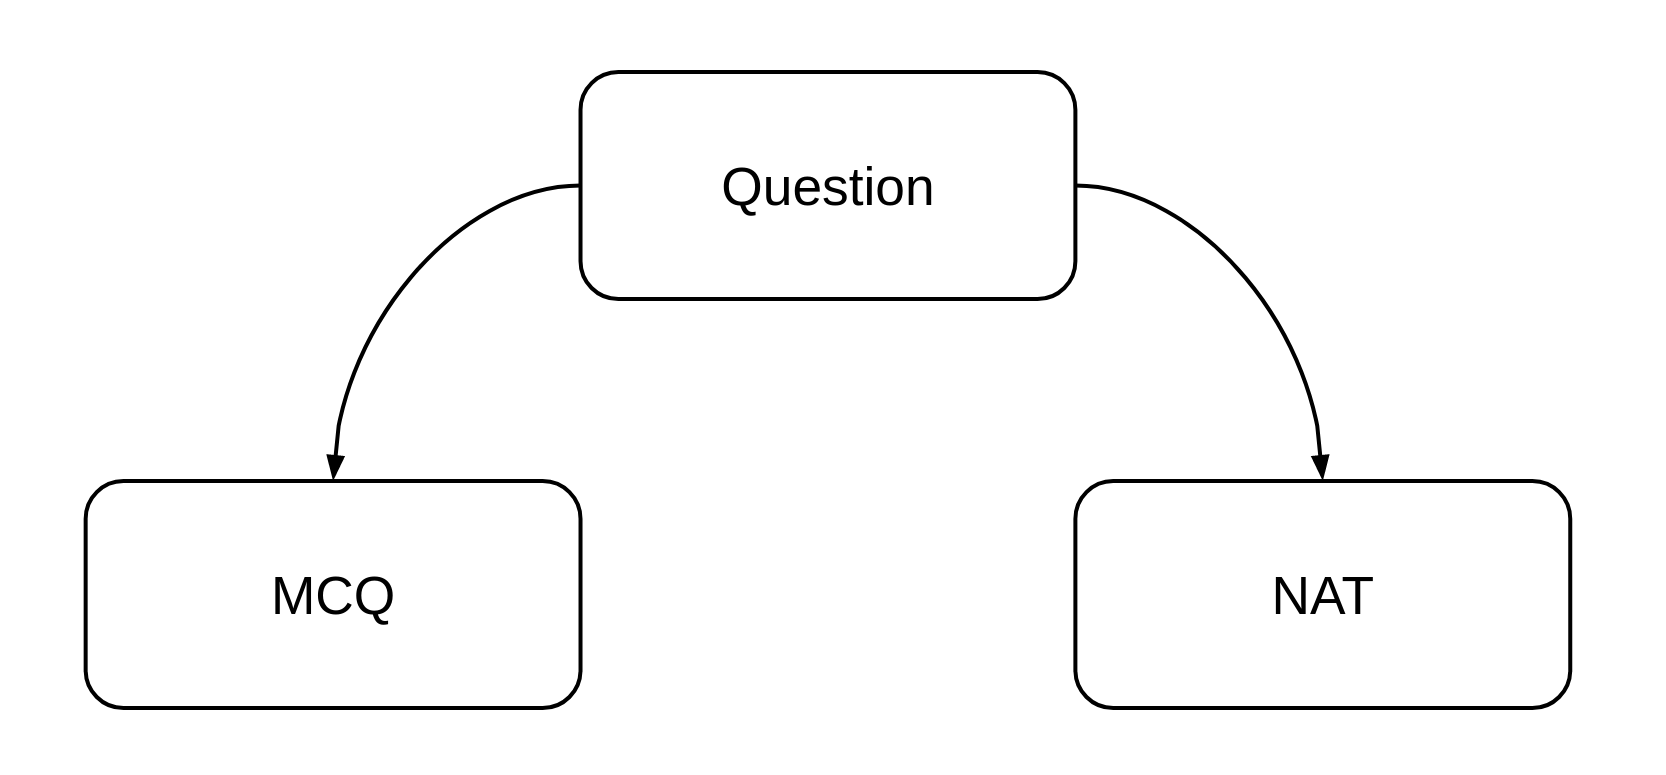
Parents always come first in the hierarchy. So, let us first define a class to represent a question:
class Question:
    def __init__(self, statement, marks):
        self.statement = statement
        self.marks = marks
    def print_question(self):
        print(self.Statement)

    def update_marks(self, marks):
        self.marks = marks
Note that we have only retained those elements as attributes that are common to all questions, irrespective of the type:
statement of the question
marks for the question
The next step is to define two new classes for the children of Question, one for MCQ and the other for NAT. It is here that we make use of the relationship that we just diagrammed:
class NAT(Question):
    def __init__(self, statement, marks, answer):
        super().__init__(statement, marks)
        self. Answer = answer

    def update_answer(self, answer):
        self.answer = answer
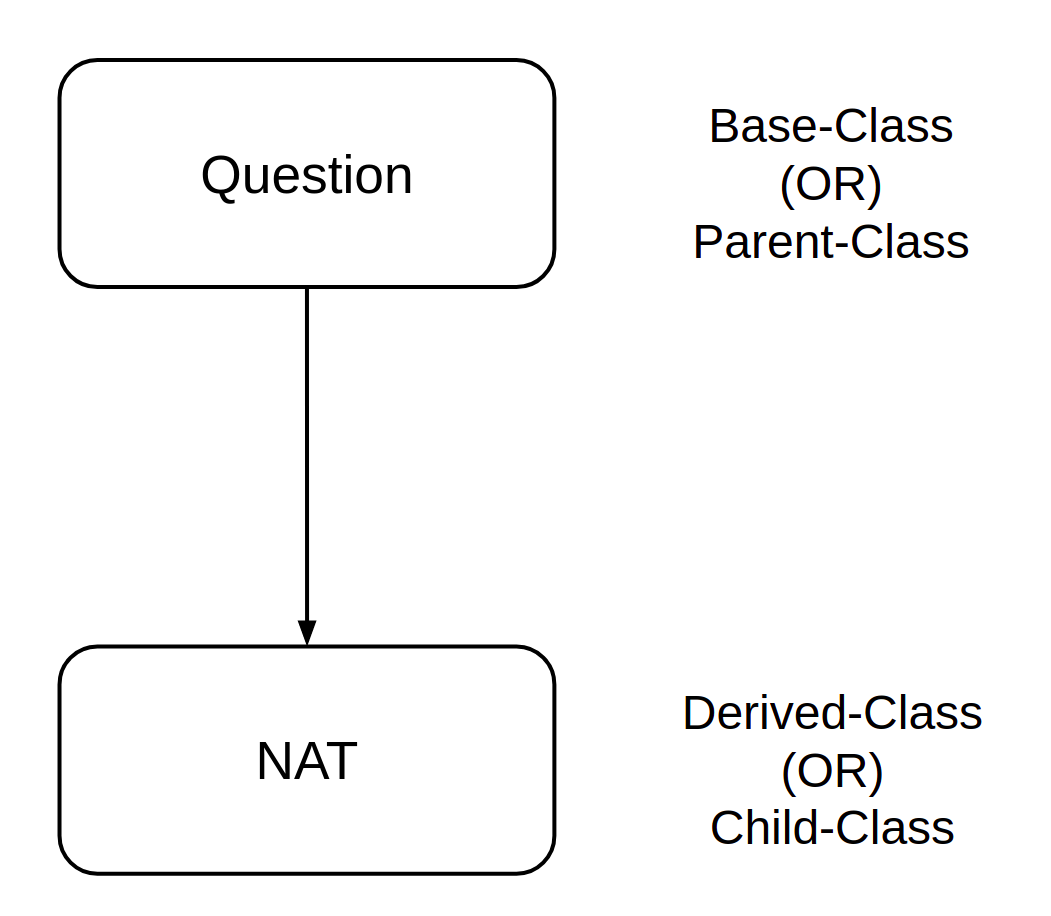
NAT is also a Question, but a specialized question. Specifically, it has an additional feature, answer, and a new method, update_answer. But all the other attributes and methods of Question are inherited by it, since NAT is just another Question.
We say that NAT is derived from Question. Question becomes the parent-class or base-class , and NAT is a child-class or derived-class.
In Python, the syntax used to make this dependency explicit is as follows:
class Derived(Base):
    def __init__(self, ...):
        pass
        #### OR ####
class Child(Parent):
    def __init__(self, ...):
        ...
In our specific example, we have:
class NAT(Question):
   def __init__(self, ...):
        pass
Parent-child relationship
Note that something interesting happens within the constructor of the derived class:
class NAT(Question):
    def __init__(self, statement, marks, answer):
        super().__init__(statement, marks)
        self.answer = answer

    def update_answer(self, answer):
        self.answer = answer
The super() function points to the parent class, in this case Question. So, in line-3, we are effectively calling the constructor of the parent class. If we need to update the marks, we can just invoke the method update_marks that is inherited from Question:
q_nat = NAT('What is 1 + 1?', 1, 2)
q_nat.update_marks(4)
print(q_nat.marks)
Method Overriding
Method overriding is a concept in object-oriented programming (OOP) that allows a subclass to provide a specific implementation of a method that is already defined in its superclass. When a method in a subclass has the same name, parameters, and return type as a method in its superclass, it overrides, or replaces, the superclass's method during runtime.
Let us now turn our attention to methods. Pasting the parent-class here for easy reference:
class Question:
    def __init__(self, statement, marks):
        self.statement = statement
        self.marks = marks

    def print_question(self):
        print(self.statement)

    def update_marks(self, marks):
        self.marks = marks
Sometimes we may want to modify the behaviour of existing methods in the parent class. For example, take the case of a MCQ question. For questions of this type, the statement of a problem is incomplete without the options. The print_question method in the parent class just prints the statement, but it makes more sense to print the options as well for a MCQ question. So, we want the print_question to behave differently. Though we have inherited this method from the parent class, we can override the behaviour of the method in the following way:
class MCQ(Question):
    def __init__(self, statement, marks, ops, c_ops):
        super().__init__(statement, marks)
        self.ops = ops      # list of all options
        self.c_ops = c_ops  # list of correct options


    def print_question(self):
        super().print_question()
        # Assume there are only four options
        op_index = ['(a)', '(b)', '(c)', '(d)']
        for i in range(4):
            print(op_index[i], self.ops[i])
Note that the parent class Question already prints the statement. So, we piggy-back on this behaviour using the super() function in line-8. In addition, we also print the options. Let us create a MCQ question object and see how it all works:
q_mcq = MCQ('What is the capital of India?',
           2,
           ['Chennai', 'Mumbai', 'Kolkota', 'New Delhi'],
           ['New Delhi'])5q_mcq.print_question()
This returns the output:
What is the capital of India?
(a) Chennai
(b) Mumbai
(c) Kolkota
(d) New Delhi


Here's a simple example demonstrating multiple inheritance in Python:
class Parent1:
    def method1(self):
        print("Parent 1 method")

class Parent2:
    def method2(self):
        print("Parent 2 method")

class Child(Parent1, Parent2):
    def method3(self):
        print("Child method")

# Creating an object of the Child class
c = Child()

# Accessing methods from both Parent1 and Parent2 classes
c.method1()  # Output: Parent 1 method
c.method2()  # Output: Parent 2 method

# Accessing method from the Child class
c.method3()  # Output: Child method
Encapsulation
Encapsulation is one of the four fundamental concepts of object-oriented programming (OOP), along with inheritance, polymorphism, and abstraction. It refers to the bundling of data and methods that operate on the data into a single unit, called a class. The data within the class is hidden from external access and can only be accessed and modified through the methods defined within the class.
In Python, encapsulation is typically achieved using private and public access modifiers. However, unlike some other object-oriented languages like Java, Python does not enforce strict access control. Instead, it relies on naming conventions and developer discipline.
Here's how encapsulation works in Python:
Private Members: In Python, private members are denoted by prefixing the member name with a double underscore
__. These members are not directly accessible from outside the class.Public Members: Members without any leading underscores or with a single leading underscore are considered public and can be accessed directly from outside the class.
Here's an example demonstrating encapsulation in Python:
pythonCopy codeclass EncapsulationExample:
    def __init__(self):
        self.public_variable = "I am a public variable"
        self.__private_variable = "I am a private variable"

    def get_private_variable(self):
        return self.__private_variable

    def set_private_variable(self, value):
        self.__private_variable = value

# Create an object of the class
obj = EncapsulationExample()

# Accessing public variable directly
print(obj.public_variable)  # Output: I am a public variable

# Accessing private variable directly raises an error
# print(obj.__private_variable)  # This will raise an AttributeError

# Accessing private variable using getter method
print(obj.get_private_variable())  # Output: I am a private variable

# Modifying private variable using setter method
obj.set_private_variable("Modified private variable")
print(obj.get_private_variable())  # Output: Modified private variable
In this example:
public_variableis a public variable that can be accessed directly.__private_variableis a private variable that cannot be accessed directly from outside the class. Getter and setter methods (get_private_variableandset_private_variable) are used to access and modify the private variable.
Encapsulation helps in data hiding, abstraction, and controlling access to the members of a class, thereby improving code maintainability and security.
Introduction to NumPy

NumPy : Numerial - python
ndarray : N-dimensional array


Python considers all these as one dimensional lists.
Whereas,

Creating Arrays
One of the foundational tasks in NumPy is creating arrays. An array is essentially a data structure that stores values of the same type in Python, and it's crucial for machine learning tasks because data in ML is typically represented as arrays. Here's how to create arrays in NumPy:
From a Python List: You can create a NumPy array directly from a Python list.
  import numpy as np
  arr = np.array([1, 2, 3, 4, 5])
Using Functions: There are several built-in functions in NumPy that allow for array creation, such as
zeros(),ones(), andarange().zeros_arr = np.zeros(5) # Creates an array of zeros with length 5 ones_arr = np.ones(5) # Creates an array of ones with length 5 range_arr = np.arange(5) # Creates an array with values [0, 1, 2, 3, 4]
Data Types
In NumPy, arrays are grids of values, and they can contain various data types. By default, NumPy tries to guess the data type for the array based on the values you provide, but you can explicitly specify the data type using the dtype parameter.
Common data types include:
int64: Integer typefloat64: Floating point typecomplex128: Complex number typebool: Boolean type (True/False)
For instance, to create an integer array:
arr = np.array([1, 2, 3, 4], dtype='int64')
Slicing & Indexing
Slicing and indexing are vital operations when working with NumPy arrays, especially in the context of machine learning where you often need to select specific data points or split datasets.
Indexing: Just like Python lists, you can access an array's elements by referring to its index number.
  arr = np.array([10, 20, 30, 40, 50])
  first_element = arr[0]  # Returns 10
Slicing: To select a range of elements from an array, you can use the slice notation, which consists of the start index, end index, and the step value.
subset = arr[1:4] # Returns an array with values [20, 30, 40]
Reshaping Arrays
The shape of a NumPy array is crucial when you're feeding data into machine learning models. Often, you'll need to reshape data to fit the input or output structure of a model.
The reshape() method allows you to reorganize the data within an array, providing a new shape without changing the data itself.
arr = np.array([1, 2, 3, 4, 5, 6])
reshaped_arr = arr.reshape(2, 3)  # Reshapes the array into a 2x3 matrix
It's crucial to note that the total number of elements must remain the same when reshaping.
Stacking & Splitting
Machine learning often requires merging datasets or splitting them for tasks like training and testing.
Stacking: You can use
vstack()for vertical stacking andhstack()for horizontal stacking.arr1 = np.array([1, 2, 3]) arr2 = np.array([4, 5, 6]) stacked_arr = np.vstack((arr1, arr2)) # Stacks arr2 below arr1Splitting: The
array_split()function can split an array into multiple smaller arrays.arr = np.array([1, 2, 3, 4, 5, 6]) split_arr = np.array_split(arr, 2) # Splits the array into two arrays
Copying Arrays
One of the foundational concepts to grasp in NumPy is the difference between copying by reference and creating a true copy of an array. When working with data, especially in machine learning, it's essential to understand how your data is being manipulated to avoid unintentional changes to your datasets.
Shallow Copy (View) vs. Deep Copy
Shallow Copy (View): When you create a shallow copy of an array, both the original and the copy refer to the same memory location. Any changes made to one will reflect on the other.
  import numpy as np
  arr = np.array([1, 2, 3, 4])
  shallow_copy = arr.view()
  shallow_copy[0] = 10
  # Now, arr[0] will also be 10
Deep Copy: A deep copy creates an entirely new array in memory. Changes to the copied array won't affect the original and vice versa.
  deep_copy = arr.copy()
  deep_copy[1] = 20
  # arr[1] will still be 2
For machine learning tasks, where data integrity is paramount, understanding the difference between these two types of copies can be crucial.
Universal Math
NumPy offers a comprehensive set of mathematical operations that can be performed on arrays. These are termed "universal functions" as they operate universally on all elements of an array. These functions are optimized, allowing for fast and efficient computations, which is invaluable in machine learning tasks involving large datasets.
Basic Arithmetic
You can easily perform element-wise arithmetic operations on arrays. This means operations are performed on corresponding elements of arrays.
arr1 = np.array([1, 2, 3])
arr2 = np.array([4, 5, 6])
sum_arr = arr1 + arr2  # Outputs [5, 7, 9]
Aggregation Functions
Aggregation functions operate over arrays and return single values. They are useful in machine learning for summarizing data or checking data properties.
np.sum(): Sum of all elements.np.min(): Minimum value in array.np.max(): Maximum value in array.np.mean(): Mean of all elements.
Trigonometric and Exponential Functions
For tasks like feature engineering or specific algorithms, you might need trigonometric or exponential functions. NumPy has you covered with functions like:
np.sin()np.cos()np.tan()np.exp(): Exponential function
Reading From Files
Machine learning projects often involve working with large datasets, commonly saved in files. These could be CSVs, text files, or other formats. NumPy provides straightforward methods to read data from these files into arrays, allowing for immediate processing.
Loading Data from Text or CSV Files
NumPy's genfromtxt and loadtxt functions are handy tools to load data from text files, like CSVs:
import numpy as np

# Using loadtxt
data = np.loadtxt('data.csv', delimiter=',')

# Using genfromtxt, which offers more advanced options
data = np.genfromtxt('data.csv', delimiter=',', skip_header=1)
Here, delimiter specifies the character that separates values in the file. For CSVs, it's typically a comma.
Handling Missing Values
Real-world data isn't always clean; it can have missing values. When using genfromtxt, you can handle these missing values effectively:
data = np.genfromtxt('data.csv', delimiter=',', skip_header=1, filling_values=-999)
In the above example, any missing value will be filled with -999.
Saving & Loading NumPy Objects
After data processing or model training, saving results or trained parameters is often required. Similarly, in other stages of a project, you might need to load these saved objects. NumPy makes both tasks straightforward.
Saving Arrays to Disk
To save a NumPy array as a binary .npy file:
arr = np.array([1, 2, 3, 4, 5])
np.save('array_data.npy', arr)
For multiple arrays, you can save them as a .npz file:
arr1 = np.array([1, 2, 3])
arr2 = np.array([4, 5, 6])
np.savez('arrays_data.npz', arr1=arr1, arr2=arr2)
Loading Arrays from Disk
Loading your saved data is just as simple:
loaded_arr = np.load('array_data.npy')

# For .npz files
loaded_data = np.load('arrays_data.npz')
first_array = loaded_data['arr1']
Introduction to Matplotlib

scatter plot:
import matplotlib.pyplot as plt
import numpy as np

a=np.array([1,2,3,4,5,6,7,8,9,10])
b=np.array([1,2,3,4,5,6,7,8,9,10])

plt.scatter(a,b)
plt.show()


Bar Chart:
import matplotlib.pyplot as plt
import numpy as np

a=np.array(["a","b","c","d"])
b=np.array([20,80,30,50])
plt.bar(a,b)


plt.show()

plt.barh(a,b)


step-by-step guide on how to create a plot using Matplotlib, including any type of function such as trigonometric, exponential, or logarithmic functions
- Import Necessary Libraries: Begin by importing Matplotlib along with any other libraries you may need for your specific calculations. For mathematical functions, you may also need NumPy.
import matplotlib.pyplot as plt
import numpy as np
- Generate Data: If you're plotting a mathematical function, you'll need to generate data points for both the x and y axes. For example, if you're plotting a trigonometric function like sine or cosine, you'll create an array of x values and compute the corresponding y values.
# Generate x values (e.g., from -2π to 2π)
x = np.linspace(-2*np.pi, 2*np.pi, 100)
"""The np.linspace() function in NumPy is used to create
an array of evenly spaced numbers over a specified interval.
Here's how it works and what it does:

Parameters:

start: The starting value of the sequence.
stop: The end value of the sequence.
num: The number of evenly spaced samples to generate between
the start and stop values.
This determines the length of the output array."""
# Compute y values for the sine function
y = np.sin(x)
- Plot the Data: Once you have your data ready, you can plot it using Matplotlib's plotting functions. For a simple line plot, you can use
plt.plot().
# Plot the sine function
plt.plot(x, y)
- Customize the Plot (Optional): You can customize the appearance of the plot by adding labels, titles, legends, adjusting colors, line styles, and more.
# Add labels and a title
plt.xlabel('x')
plt.ylabel('sin(x)')
plt.title('Plot of the Sine Function')

# Show a grid
plt.grid(True)

# Show the plot
plt.show()
- Explore Further: You can explore more complex plots by adding multiple lines, combining different types of plots (e.g., scatter plots, histograms), adjusting scales (e.g., logarithmic scales), or using subplots.
Here's an example plotting the exponential function:
pythonCopy code# Generate y values for the exponential function
y = np.exp(x)

# Plot the exponential function
plt.plot(x, y)

# Add labels and a title
plt.xlabel('x')
plt.ylabel('exp(x)')
plt.title('Plot of the Exponential Function')

# Show a grid
plt.grid(True)

# Show the plot
plt.show()
And here's an example plotting the logarithmic function:
pythonCopy code# Generate y values for the logarithmic function
y = np.log(x)

# Plot the logarithmic function
plt.plot(x, y)

# Add labels and a title
plt.xlabel('x')
plt.ylabel('log(x)')
plt.title('Plot of the Logarithmic Function')

# Show a grid
plt.grid(True)

# Show the plot
plt.show()
These are the general steps you can follow to plot any type of function using Matplotlib in Python. Just replace the function and data generation step according to your requirements.
examples:


Some important point

The output you're seeing, which contains memory addresses like <main.country object at 0x7ea3312e9690>, is because you're printing the list l, which contains references to the c1 and c2 objects. When you printed the list l, it showed memory addresses because lists in Python show the representation of the objects they contain.
To get a meaningful representation of the objects c1 and c2 when printing the list l, you need to override the repr() method in the country class to return a custom string representation of the objects.
class country:
    def _init_(self):
        self.name = None
        self.capital = None

    def set_name(self, name):
        self.name = name

    def set_capital(self, capital):
        self.capital = capital

    def display(self):
        print(f'{self.capital} is the capital of {self.name}')

    def _repr_(self):
        return f'Country(name={self.name}, capital={self.capital})'

c1 = country()
c1.set_name('India')
c1.set_capital('New Delhi')
c1.display()

c2 = country()
c2.set_name('Australia')
c2.set_capital('Canberra')
c2.display()

l = [c1, c2]
print(l)

#OP:[Country(name=India, capital=New Delhi), Country(name=Australia, capital=Canberra)]
Wrap up
In this comprehensive article, we embarked on a journey through Object-Oriented Programming (OOP) principles and explored the practical applications of these concepts in real-world scenarios. Here's a quick wrap-up of what we covered:
Objects and Classes: We began by understanding the essence of objects and classes in OOP. Just like humans belong to the class "Humanity," objects encapsulate attributes and behaviors within a class blueprint, fostering unity amidst diversity.
Method Overriding: Delving deeper, we uncovered the concept of method overriding, where subclasses can redefine methods inherited from their superclasses, enabling customized implementations while maintaining a cohesive structure.
Inheritance: Building upon the hierarchical relationships between classes, we explored inheritance, a powerful mechanism that allows subclasses to inherit attributes and behaviors from their ancestors, promoting code reusability and extensibility.
Introduction to NumPy: Transitioning to practical implementation, we introduced NumPy, a fundamental library for numerical computing in Python. From creating arrays to performing universal math operations, NumPy equips us with essential tools for efficient data handling.
Introduction to Matplotlib: Finally, we dived into Matplotlib, a versatile plotting library that empowers us to visualize data effectively. Through scatter plots, bar charts, and more, Matplotlib enables us to convey insights and tell compelling stories with our data.


